Modding:Options
| This page is about modding. See the modding overview for an abstract on modding. |
Adding new options
In some cases it may be desirable to add tunable settings to your mod so that players may configure it to their liking. In these cases, you can piggyback off of Qud's built in options menu by merging your own settings into Options.xml.
Here's an example of a custom Options.xml:
<?xml version="1.0" encoding="utf-8" ?>
<options>
  <option ID="Option_MyName_MyMod_EnableFoo" DisplayText="Enable Foo"
    Category="Mods: MyMod" Type="Checkbox" Default="Yes" />
  <option ID="Option_MyName_MyMod_FooSelector" DisplayText="Foo, Bar, or Baz?"
    Category="Mods: MyMod" Type="Combo" Default="Foo" />
</options>
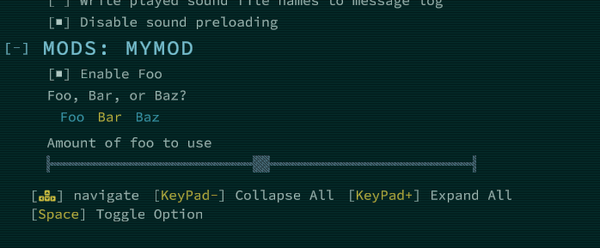
This produces a new section in the options menu, which appears as follows:
The <option/> XML tag defines a new setting in Options.xml. This tag can have the following attributes:
| Tag | Meaning |
|---|---|
ID
|
A unique ID corresponding to the option. This ID is referred to in the code when retrieving the value of the configured setting. |
DisplayText
|
The text that should be displayed alongside the option in the settings menu. |
Category
|
The area under which the option appears in the settings menu. In general, all of your options should go under a single custom category for your mod. |
Type
|
Affects the widget that is rendered for the option, and the values that it can take on. The following widget types are currently supported:
Each of these types has custom attributes that are specific to them; refer to the base game's |
Default
|
The default value that the option should be set to, before any user configuration. |
Requires
|
Hides an option unless a precondition is met. For instance, adding Requires="MyName_MyMod_EnableFoo==Yes" to an option will hide that option unless the checkbox for the "Enable Foo" option is selected.
|
SearchKeywords
|
Additional keywords that players can use to find an option in the settings menu. |
Using configured options in code
Once you've added your own custom options, you can retrieve them in code using the XRL.UI.Options.GetOption method. This method always returns a string, but you may want to convert them into a different type before using them in your code. One way of doing so is to create a thin wrapper around XRL.UI.Options that calls GetOption under the hood, for instance:
using System;

namespace MyName.MyMod {
    public static class Options {
        private static string GetOption(string ID, string Default = "") {
            return XRL.UI.Options.GetOption(ID, Default: Default);
        }

        public static bool EnableFoo => GetOption("Option_MyName_MyMod_EnableFoo").EqualsNoCase("Yes");
        public static int FooAmount => Convert.ToInt32(GetOption("Option_MyName_MyMod_FooAmount"));
    }
}
Enabling and disabling XML
| This section contains modding information that is only applicable to the in-development beta branch of Caves of Qud on Steam. |
Options can be used to conditionally enable XML using the Directories array in the mod's manifest.json.
For a solution that works in the stable version of the game, check out the submodule-management mod.
Type Errors
If Options.xml contains a syntax error, it will be listed in the Player.log as normal. However, type errors are only evaluated on opening the in-game options menu. The menu will fail to open and you'll see an error in the Player.log: ---> (Inner Exception #0) System.FormatException: Input string was not in a correct format.. If you save the game without opening the options menu, this erroneous value will then be stored in PlayerOptions.json and, because those values are only regenerated on close of the options menu, you will need to manually edit and correct the file.
| |||||||||||||||||
